Page 1 - CAUTION; IMPORTANT 1
2 En/Fr [For Stereo CD Receiver XC-L77]CAUTION This product contains a laser diode of higherclass than 1. To ensure continued safety, donot remove any covers or attempt to gain ac-cess to the inside of the product.Refer all servicing to qualified personnel. The following caution label appears on you...
Page 2 - Contents
3 English Français En/Fr Contents 1 Before You Start Before you Start ................................................................. 4 2 Installing and Connecting up Finding a Suitable Location .............................................. 8Connecting Up the System .................................
Page 3 - Vérification du contenu de l’emballage; Before You Start
4 En/Fr Checking What’s in the Box Thank you for buying this Pioneer product. Before starting to setup your new stereo system, please check that you received thefollowing supplied accessories in theXC–L77 Stereo CD Receiver box: • AM loop antenna • FM wire antenna • Power cord • Display unit connect...
Page 4 - Using the remote control
5 English Français En/Fr CAUTION: • Remove the battery if the remote is not going to be usedfor a month or more. • Remove dead batteries promptly—they can leak anddamage the unit. • If the remote is connected to the display, no battery isnecessary for it to work. The battery is not recharged byconne...
Page 6 - Using cassette tapes; Erase protection; For side A; Utilisation de cassettes; Protection des enregistrements
7 English Français En/Fr Using cassette tapes The tape of a cassette is quite easily damaged and loose tape canjam in the tape deck mechanism. If the tape has becomeunwound, use a pen or pencil to wind it back on tothe spool. When not using cassettes, always store in the case.Store cassettes away fr...
Page 7 - Installing and Connecting Up; Finding a Suitable Location; Avoiding condensation problems; Evitez les problèmes de condensation
2 Installing and Connecting Up 8 En/Fr Finding a Suitable Location We want you to enjoy using your new stereo system for years tocome, so please bear in mind the following points when choosinga suitable location for the system components and speakers: Do... ✔ Use in a well-ventilated room. ✔ Place o...
Page 8 - Connecting Up the System; If you also have the tape deck:; Raccordement de la chaîne; Si vous avez aussi la platine à cassette:
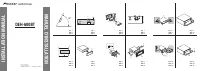
9 English Français En/Fr Connecting Up the System Important: Before making or changing any rear panel connections, make sure that all the components are switched offand unplugged from the power supply. The CD receiver is the central component of the system: everythingelse connects to it. The diagram...
Page 9 - Ribbon cords; Câble ruban
2 Installing and Connecting Up 10 En/Fr IMPORTANT: Never connect or disconnect the system ribbon cords while the power plug is connected to the walloutlet. Doing so may damage the unit. To insert, hold the connector and push firmly into the socketuntil you hear it click home. To remove, hold the con...
Page 10 - Connecting the speakers
11 English Français En/Fr Left speakerEnceinte gauche Right speakerEnceinte droite Speaker cordCâble d'enceinte Sub-woofer cordCâble de caisson de grave Sub-wooferCaisson de grave Connecting the speakers The S–L8/S–L9/S–L9-A speaker system consists of two compactsatellite speakers that deliver the m...
Page 11 - Placing the satellite speakers; Speaker terminal connectors; Emplacement des enceintes satellites; Bornes d’enceintes
2 Installing and Connecting Up 12 En/Fr Placing the satellite speakers CAUTION! The speaker system is not magnetically shielded.This means that if the speakers are placed very neara television set or monitor, you may see colordistortion in the picture. Move the speaker(s)further away from the televi...
Page 12 - Note; Choosing a listening position; Listening; Remarque; Sélection de la position d’écoute; Position
13 English Français En/Fr 2–3 meters The speakers come with stands that can be used if you plan to putthe speakers on a shelf or table. It’s possible to attach the stands sothat the speakers stand upright (as shown in the illustration onpage 15, for example), or on their side—as shown in the diagram...
Page 13 - Placing the subwoofer; Connecting the antennas; Emplacement du caisson de grave; Raccordement des antennes
2 Installing and Connecting Up 14 En/Fr Placing the subwoofer Placement of the subwoofer is not as critical as the satellitespeakers because bass sounds are much less directional thanmiddle and treble sounds. However, bear the following points inmind when choosing a suitable location: ❖ The subwoofe...
Page 15 - Connecting other components; Connecting external antennas; Raccordement d’autres appareils; Raccordement d’antennes autonomes
2 Installing and Connecting Up 16 En/Fr Connecting other components ^ ) STANDBY/ON PHONES R L AUX/CD-R IN R L OUT (PLAY) (OPT.) DIGITAL OUT (OPT.) DIGITAL IN L R L R PlaybackLecture RecordingEnregistrement Standard stereo audio lead (not supplied) Câble audio stéréo ordinaire (non fourni) Optical di...
Page 16 - Plugging in to the mains; CAUTION! Handling power cords; Branchement sur le secteur
17 English Français En/Fr The CD receiver has analog audio inputs and an optical digitaloutput for connecting up other components. Possible uses for theanalog inputs include sound from a VCR or satellite receiver, afile-type (‘jukebox’) CD player, or turntable (with suitable phonoamplifier). Use a s...
Page 17 - Front Panel; CD Receiver; Tape deck; Panneau avant; Platine à cassette
18 En/Fr Front Panel CD Receiver 1 CD tray 2 Power light – Lights when the unit is switched on. 3 ^ button – Press to play a disc, or pause a disc that’s already playing (press again to restart playback). 4 ) button – Press to open or close the CD tray. 5 Play light – Lights when a CD is playing 6 S...
Page 18 - Remote Control; Télécommande
19 English Français En/Fr Remote Control 1 MENU – Press to access various features, including station memory naming, changing the tape reversemode, and so on. 2 Tape deck mode – Press to switch the sound to tape deck and start the tape playing (if there’s one loaded). 3 SOUND – Press to put the $ an...
Page 19 - Display; Remote Locator; Afficheur; Localisateur de télécommande
20 En/Fr Display 1 Tape function – Highlights when in tape deck mode 2 CD function – Highlights when in CD player mode 3 MD function – Highlights when in MD recorder mode 4 Tuner function – Highlights when in tuner mode 5 Aux/CD-R function – Lights when in aux/CD-R mode 15 MD mode – Press to switch ...
Page 21 - Mettez l’appareil sous tension.
22 En/Fr Switching On and Settingthe Clock If you've followed the manual to here, you should now have yoursystem installed with everything connected up and plugged in.This chapter takes you through using the basic features: playingCDs and tapes, listening to radio stations, and adjusting thevolume, ...
Page 22 - Playing a CD; Lecture d’un disque compact; Conseil
23 English Français En/Fr Remember: If power is interrupted, the clock display will flash until you reset it to the correct time. To use the timer features,always set the clock to the correct time. Playing a CD ) Printed/label side Face imprimée/étiquetée 8cm disc guide Guide pour disques de 8 cm 12...
Page 23 - Down
24 En/Fr 1 With the system switched on, press ) on the front panel of the CD receiver. The disc tray ejects. Place a CD, with the label face up, on tothe disc tray, making sure that it is seated properly in the discguide. Note: Do not use an adapter when playing 8cm CD- singles. The disc tray has gu...
Page 24 - Tip; Adjusting the Sound; Réglage du son
25 English Français En/Fr Tip In step 2 above, pressing the CD button closed the disctray and set the disc playing. In fact, pressing thisbutton is always the quickest way to play a disc. Ifthere's already a disc in the player, then pressing theCD button—even when the system is in standbymode—will s...
Page 26 - Listening to the Radio; Press TUNER to switch to tuner mode.; TUNER; Ecoute de la radio; Appuyez sur TUNER pour mettre la radio
27 English Français En/Fr Listening to the Radio The tuner can receive both FM and AM broadcasts, and lets youmemorize your favorite stations so you don't have to manuallytune in every time you want to listen. Here we run through thebasic tuner controls, including switching between AM and FM, andtun...
Page 27 - Improving FM reception; MENU; Amélioration de la réception FM
28 En/Fr Improving FM reception If you're listening to an FM station in stereo but the reception isweak, you can improve the sound quality by switching to mono: AUX/CD-R SOUND DISPLAY SET MD TAPE TIMER/ CHARACTER & CANCEL REC $ ! — › + ⁄ VOL STANDBY / ON MENU SET 4 ¢ 1 Press MENU. You’re now in ...
Page 28 - Playing a Cassette Tape; TAPE; Lecture d’une cassette
29 English Français En/Fr Playing a Cassette Tape The optional CT–L77 tape deck features auto-reverse, Dolby B NR(noise reduction) and auto tape select. The auto-reverse featurelets you play or record both sides of the tape without physicallytaking it out and turning it over. Dolby B NR reduces tape...
Page 31 - Utilisation du réducteur de bruit Dolby
32 En/Fr 1 Press MENU. The tape menu options are: 2 Use $ or › to select DOLBY NR, then press SET. 3 Press $ or › to switch between Dolby NR on and off. 4 Press SET again to exit the menu. The Dolby NR indicator ( 2 NR ) lights in the display when Dolby NR is on. $ REVERSE MODE › DOLBY NR – COUNTER ...
Page 32 - Using the Menu System; The CD menu
33 English Français En/Fr Using the Menu System Access to many of the less commonly used functions of the systemis via a menu system. Each component (CD player, tuner, tapedeck, auxiliary, and MD recorder) has it's own set of menuoptions, but access to all of them is from the MENU button. If you wor...
Page 33 - The tape menu
34 En/Fr 1 Press MENU and select CD PROGRAM. Remember: switch between menu options using the $ and › buttons; select the option by pressing SET . 2 Select a track to add to the playlist using the $ or › buttons. For example, to add track 3, press › three times. Or, to add the last but one track, pre...
Page 34 - Checking the playlist order; Vérification de la liste de lecture
35 English Français En/Fr 3 Press SET to add the track to the playlist. 4 Repeat steps 2 and 3 to continue adding tracks to the playlist. If you make a mistake, press CANCEL to delete the last (most recent) track programmed. (Delete multiple tracks bypressing CANCEL repeatedly.) 5 When you're happy ...
Page 35 - Playing Things Again; Press MENU and select CD REPEAT; Select a repeat mode.; Lecture répétée de plages; Appuyez sur MENU et sélectionnez CD; Sélectionnez un mode de répétition.; Commencez la lecture.
36 En/Fr Note: The repeat mode you set stays active until you: ❖ select another repeat mode, or switch repeat mode offusing the menu. Playing Things Again You can set the CD player to repeat either a single track over andover, or the whole disc. 1 Press MENU and select CD REPEAT MODE. Remember: swit...
Page 36 - Press MENU and select CD RANDOM; Playback begins automatically.; Playing Tracks at Random; La lecture commence automatiquement.
37 English Français En/Fr 1 Press MENU and select CD RANDOM PLAY. Remember: switch between menu options using the $ and › buttons; select the option by pressing SET . 2 Playback begins automatically. Pressing & during random play stops playback, and random play mode is canceled. You can use rand...
Page 37 - Changing the Display; When the disc is stopped; Changement d’affichage; Pendant l’arrêt du disque
38 En/Fr Changing the Display You can choose to display various kinds of information duringplayback and stop modes. Switch between them by pressing the DISPLAY button. When the disc is stopped CD DISC TOTAL - displays the number of tracks and the total playing time of the disc CLOCK - displays the c...
Page 38 - Tune into a radio station on either the; The Tuner Menu; Accordez une station radio sur la gamme; Le menu radio
39 English Français En/Fr 1 Tune into a radio station on either the AM or FM band. See page 27 for detailed instructions on how to do this. 2 Press MENU and select STATION MEMORY. Remember: switch between menu options using the $ and › buttons; select the option by pressing SET . Memorizing Stations...
Page 41 - Enter a name for the current station; To select a character:; When you're happy with the station name,; Pour sélectionner un caractère:; Lorsque vous êtes satisfait du nom de la
42 En/Fr Tip If you make a mistake, you can go back and correct thelast character by pressing DISPLAY . To abort completely and start again, press CANCEL . 3 Enter a name for the current station memory. Names can be up to 9 characters long and can contain letters(upper and lower case), numbers, spac...
Page 42 - An Introduction to RDS
43 English Français En/Fr An Introduction to RDS Radio Data System, or RDS as it's usually known, is a system usedby FM radio stations to provide listeners with various kinds ofinformation—the name of the station and the kind of show they'rebroadcasting, for example. This information shows up as tex...
Page 43 - Tune into an FM radio station.; Accordez une station radio FM.
44 En/Fr Displaying RDSInformation You have access to three kinds of RDS information, and can freelyswitch between them. 1 Tune into an FM radio station. Only FM stations broadcast RDS data, so you must belistening to a station in the FM band to display any RDSinformation. For more detailed instruct...
Page 44 - Press DISPLAY and select PTY SEARCH.; Appuyez sur DISPLAY et sélectionnez
45 English Français En/Fr Searching for a ProgramType One of the most useful features of RDS is the ability to search for aparticular kind of radio program. You can search for any of theprogram types listed on pages 43 and 44 —this covers all kinds ofmusic, as well as news, weather forecasts, sports...
Page 46 - Changing the display
47 English Français En/Fr Changing the display You can choose to display various kinds of information whenlistening to the tuner. Switch between them by pressing the DISPLAY button: FREQUENCY - displays the current radio frequency RT - displays RDS radio text information PS - displays RDS program se...
Page 47 - Setting the Reverse Mode; Press MENU and select REVERSE MODE.; Appuyez sur MENU et sélectionnez
48 En/Fr Setting the Reverse Mode The tape deck can play both sides of a tape without you having totake the cassette out and turning it over by hand. This feature iscalled auto-reverse (because to play the other side of the tape, thetape travels in the opposite direction). You can switch sides any t...
Page 48 - Making Tape Recordings
49 English Français En/Fr Making Tape Recordings You can make tape recordings from any other component in thesystem, and also from an external component connected to theAUX/CD-R inputs. If you're recording from CD or the optional MDrecorder, it's usually most convenient to use the synchro-recordingm...
Page 49 - CD; Mettez une cassette dans la platine à; Réglez le mode d’inversion automatique.
50 En/Fr 1 Load a cassette into the tape deck. In order to follow these instructions more easily, place thecassette in the tray with side A face up. 2 Check the recording direction. If the tape direction indicator shows 3 , then recording will start from side A. If it shows 2 , then recording will s...
Page 53 - Recording Other Sources; TAPE REC
54 En/Fr Recording Other Sources Usually, when recording a CD or MD, the synchro-recordingfeature is the easiest way to do it. However, if you want to recordfrom the tuner or from a component connected to the AUX/CD-Rinputs, you'll need to start and stop the recording manually. 1 Follow steps 1–4 of...
Page 54 - Resetting the Tape Counter
55 English Français En/Fr 4 Press TAPE to begin recording. If you’re recording from a component that requires you tostart playback (a turntable or another cassette deck, forexample), start playback here. To pause recording, press TAPE REC . To resume, press again. 5 When you want to finish the recor...
Page 55 - Select the component you want the timer; TIMER; Le menu de la minuterie; Sélectionnez l’élément qui doit être mis
56 En/Fr The Timer Menu Using the timer features you can automatically record a programfrom the tuner at a certain time, wake up to a CD playing, or fallasleep at night tothe radio. Access to these functions is from the TIMER menu, which is accessed by pressing the TIMER button. The menu has four op...
Page 56 - Set the time to switch on.
57 English Français En/Fr 2 Select WAKE-UP from the timer menu. Remember: switch between timer menu options using the $ and › buttons; select the option by pressing SET . 3 Set the time to switch on. First, set the hour: Use the $ and › buttons to change the flashing hour display, then press SET . N...
Page 57 - Setting Multiple Timers; Sélectionnez WAKE-UP sur le menu de la; Réglage de plusieurs minuteries
58 En/Fr Cancelling the Wake UpTimer The wake-up timer doesn't automatically cancel, since you maywell want to have the system switch on every morning at the sametime, for example. 1 Select WAKE-UP from the timer menu. Remember: switch between timer menu options using the $ and › buttons; select the...
Page 58 - Select SLEEP TIMER from the timer; OFF; Setting the Sleep Timer; Sélectionnez SLEEP TIMER sur le menu; OFF; OFF
59 English Français En/Fr 1 Select SLEEP TIMER from the timer menu. Remember: switch between timer menu options using the $ and › buttons; select the option by pressing SET . 2 Select a time option: Use the $ and › buttons to switch between options, then press SET . AUTO plays the current CD, tape o...
Page 59 - Réglez la platine à cassette ou
60 En/Fr Setting Up a FutureRecording You can set the timer to record something from either the tuner ora component connected to the AUX/CD-R inputs. For example, youmight want to record a program on the radio that is broadcastwhile you're at work. If you're recording from an auxiliarycomponent it m...
Page 61 - Select TIMER REC from the timer menu.; Sélectionnez TIMER REC sur le menu de
62 En/Fr Cancelling the RecordTimer Once the timer recording has finished, the timer is automaticallycanceled. However, if you need to cancel it before the recording hasstarted, (either because you made a mistake setting it, or simplybecause you no longer want to make the recording), here’s howyou d...
Page 63 - Symptôme; Guide de dépannage; Cause probable
65 English Français Fr Symptôme L’appareil s’arrêtebrusquement en coursde fonctionnement. Aucun son Impossible de changerde fonction. La lecture necommence pas lorsquevous appuyez sur latouche de lecture/pause. Impossible d’écouterune station oudistorsion du son. Les émissions sont enstéréo mais le ...
Page 65 - Nettoyage des coffrets; Entretien; Démagnétisation de la tête
69 English Français Fr Nettoyage des coffrets Pour nettoyer l’appareil compact, essuyez-la avec un chiffon douxet sec. Pour les tâches rebelles, utilisez un chiffon doux imprégnéd’une solution détergente diluée à raison d’une dose de détergentpour 5 ou 6 doses d’eau. Essorez bien le chiffon et enlev...
Page 66 - Spécifications
71 English Français Fr Ampli-tuner CD stéréo : XC-L77Section Amplificateur Puissance en continu Satellite (RMS) ........................ 30 W + 30 W (1 kHz, DHT 10%, 8 Ω ) Puissance en continu Caisson de grave (RMS) ....................... 50 W (100 Hz, DHT 10%, 4 Ω ) Puissance en continu Satellite ...
Page 129 - PIONEER ELECTRONIC CORPORATION
74 Ge PIONEER ELECTRONIC CORPORATION 4-1, Meguro 1-Chome, Meguro-ku, Tokyo 153-8654, Japan PIONEER ELECTRONICS [USA] INC. P.O. BOX 1540, Long Beach, California 90801-1540 PIONEER ELECTRONICS OF CANADA, INC. 300 Allstate Parkway, Markham, Ontario L3R OP2, Canada PIONEER ELECTRONIC [EUROPE] N.V. Haven...


 Pioneer DMH W3050NEX
Manuel d'utilisation
Pioneer DMH W3050NEX
Manuel d'utilisation
 Pioneer TS A653CH
Manuel d'utilisation
Pioneer TS A653CH
Manuel d'utilisation
 Pioneer DM 40
Guide de dépannage
Pioneer DM 40
Guide de dépannage
 Pioneer DMH W4600NEX
Manuel d'utilisation
Pioneer DMH W4600NEX
Manuel d'utilisation
 Pioneer DMHWC5700NEX
Manuel d'utilisation
Pioneer DMHWC5700NEX
Manuel d'utilisation
 Pioneer CD IU52
Manuel d'utilisation
Pioneer CD IU52
Manuel d'utilisation
 Pioneer VREC
Manuel d'utilisation
Pioneer VREC
Manuel d'utilisation
 Pioneer DDJ 200
Guide de dépannage
Pioneer DDJ 200
Guide de dépannage
 Pioneer DEH S4220BT
Manuel d'utilisation
Pioneer DEH S4220BT
Manuel d'utilisation
 Pioneer AVH 120BT
Manuel d'utilisation
Pioneer AVH 120BT
Manuel d'utilisation
 Pioneer VREC DH200
Manuel d'utilisation
Pioneer VREC DH200
Manuel d'utilisation
 Pioneer AVH 1550NEX
Manuel d'utilisation
Pioneer AVH 1550NEX
Manuel d'utilisation
 Pioneer K110
Manuel d'utilisation
Pioneer K110
Manuel d'utilisation
 Pioneer AVH 271BT
Manuel d'utilisation
Pioneer AVH 271BT
Manuel d'utilisation
 Pioneer CDVM1
Manuel d'utilisation
Pioneer CDVM1
Manuel d'utilisation
 Pioneer K012
Manuel d'utilisation
Pioneer K012
Manuel d'utilisation