Zanussi ZK24/10R- Manuel d'utilisation
Zanussi ZK24/10R- Manuel d'utilisation, à lire gratuitement en ligne au format PDF. Nous espérons que cela vous aidera à résoudre toutes les questions que vous pourriez avoir. Si vous avez encore des questions, contactez-nous via le formulaire de contact.

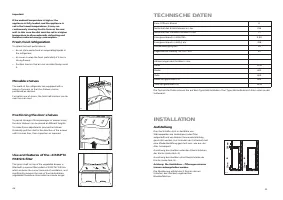
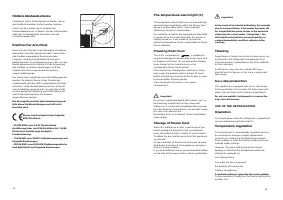
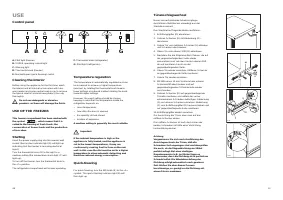
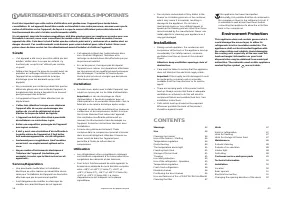
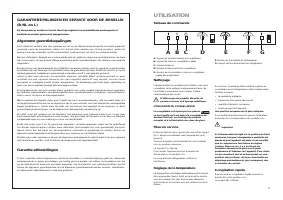
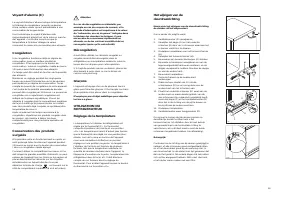
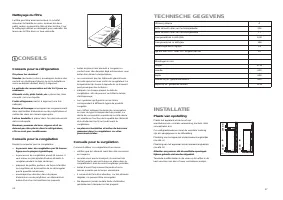

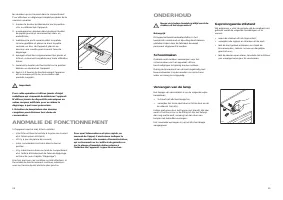
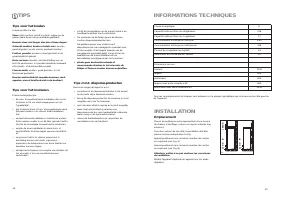
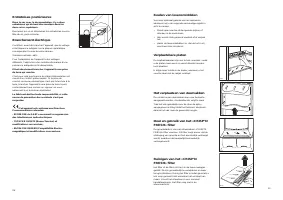
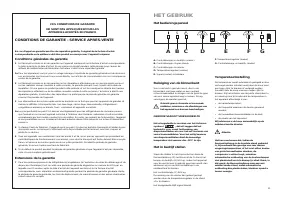
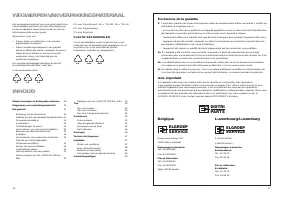
Table des matières:
- Page 9 – AVERTISSEMENTS ET CONSEILS IMPORTANTS; Sûreté; CONTENTS; Installation
- Page 10 – WARNINGS; General Safety
- Page 11 – SOMMAIRE; Garantie-uitsluitingen; België; Luxemburg
- Page 12 – Nettoyage; Mise en service; Congélation rapide; UTILISATION; Tableau de commande; A B C; GARANTIEBEPALINGEN EN SERVICE VOOR DE BENELUX
- Page 14 – Tablettes amovibles; Réfrigération
- Page 15 – Conseils pour la congélation; CONSEILS; Conseils pour la réfrigeration; Nettoyage du filtre; TECHNISCHE GEGEVENS; Plaats van opstelling
- Page 16 – Dégivrage; ENTRETIEN; STORING; Het ontdooien
- Page 17 – Schoonmaken
- Page 18 – Emplacement; Tips voor het koelen
- Page 19 – Branchement électrique; Entretoises postérieures
- Page 21 – CONDITIONS DE GARANTIE - SERVICE APRES-VENTE; HET GEBRUIK
- Page 22 – Belgique; INHOUD
Reinigung der Innenteile
Bevor Sie das Gerät in Betrieb nehmen, beseitigen
Sie den typischen «Neugeruch» am besten durch
Auswaschen der Innenteile mit lauwarmem Wasser
und einem neutralen Reinigungsmittel Sorgfältig
nachtrocknen.
Bitte keine Reinigungs- bzw. Scheuermittel
verwenden, die das Gerät beschädigen
könnten.
Gebrauch des Gefrierabteils
Dieses Gefrierabteil ist mit dem
«Viersterne-» Symbol versehen, was bedeutet,
daß darin sowohl frische Lebensmittel
eingefroren werden können als auch
Tiefkühlkost langfristig gelagert werden kann.
Inbetriebnahme
Netzstecker in die Steckdose einstecken. Das
Aufleuchten der Kontrollampe (A) zeigt an, daß das
Gerät unter Spannung steht.
Den Schalter (D) über die Stellung «O» drehen. Die
Kontrollampe (C) leuchtet auf.
Den Stillstand erhält man durch Drehen des
Schalters (D) auf Stellung «O». Das Kühlabteil bleibt
in Betrieb.
Temperaturregelung
Die Temperatur wird automatisch geregelt und kann
erhöht werden (wärmer) durch Drehen des Thermo-
statknopfes auf niedrigere Einstellungen oder
verringert (kälter) durch das Drehen auf höhere
Zahlen.
Die richtige Einstellung erhält man, unter
Berücksichtigung folgender, die Innentemperatur
beeinflussender Faktoren:
•
Raumtemperatur,
•
Häufigkeit des Türöffnens,
•
Menge der eingelagerten Lebensmittel,
•
Aufstellung des Gerätes.
Die mittlere Einstellung ist meistens die
geeignetste.
Wichtig
Höchste Kälteeinstellung bei hoher
Raumtemperatur und erheblicher
Lebensmittelmenge kann fortdauernden
Kühlschrank-Betrieb verursachen, dabei kann
sich eine Reif- oder Eisschicht an der hinteren
Innenwand bilden. In diesem Falle den
Thermostatknopf auf wärmere Temperaturen
stellen, damit das automatische Abtauen, mit
folglich geringerem Stromverbrauch,
gewährleistet werden kann.
GEBRAUCH
Bedienungsblende
4
3
A B C
F
S
N
S
G
4
3
D
E
A. Betreibskontollampe(Gefrierabteil)
B. Schnellgefrierkontrollampe
C. Alarm-Lampe
D.Temperaturregler(Thermostat)Gefrierabteil
E. Schnellgefrierschalter (Normal/Super)
F. Temperaturregler (Thermostat) Kühlabteil
G.Betriebskontrollampe (Kühlabteil)
Schnellgefriervorgang
Schalterknopf (E) auf «S» drehen. Die Kontrollampe
(B) leuchtet auf.
Alarmlampe (C)
Die Alarmlampe leuchtet auf, wenn die Temperatur
im Geräteinneren steigt, und dadurch die richtige
Lagertemperatur nicht mehr gewährleistet wird. Sie
leuchtet jedoch auch dann auf, wenn das Gerät
gerade eingeschaltet worden ist und bleibt solange
eingeschaltet, bis die richtige Lagertemperatur
erreicht ist.
5
52
Changing the opening direction of
the doors
Before carrying out any operations, remove the plug
from the power socket.
To change the opening direction of the door,
proceed as follows:
1. pull off the ventilation grille (D) which is clipped
into place;
2. remove the hole cover (G) and the bottom hinge
(E) by unscrewing its three fixing screws;
3. remove the lower door, sliding it out of the middle
hinge;
4. unscrew the middle hinge (H);
5. remove the upper door, releasing it from the
upper pin (G);
6. unscrew the upper pin (G) and refit it on the
opposite side;
7. remove the two plugs of the door (where
available), discovering the holes for the hinge
pins, assemble them on the opposite side and
refit the upper door;
8. reassemble the middle hinge on the opposite
side;
9. using a 10 mm spanner, unscrew the hinge pin
(E) and reassemble it on the opposite side of the
hinge;
10. reassemble the lower hinge (E) on the opposite
side, using the screws previously removed; insert
the hole cover (G) on the lower hinge. Slide the
hole cover (F) out of the ventilation grille (D) by
pushing it in the direction of the arrow and
reassemble it on the opposite side;
11. reassemble the lower door;
12. refit the ventilation grille (D), clipping it into
place.
To line up the doors, it is possible to adjust the
middle hinge (H) horizontally by means of a tool,
after slackening the two screws (see figure).
Warning:
After having reversed the opening direction of the
doors check that all the screws are properly
tightened and that the magnetic seal adheres to the
cabinet. If the ambient temperature is cold (i.e. in
Winter), the gasket may not fit perfectly to the
cabinet. In that case, wait for the natural fitting of the
gasket or accelerate this process by heating up the
part involved with a normal hairdrier.
G
H
F
D
PR18
F
F
F
E
E
G
D419
„Téléchargement du manuel“ signifie que vous devez attendre que le fichier soit complètement chargé avant de pouvoir le lire en ligne. Certains manuels sont très volumineux, et le temps de chargement dépend de la vitesse de votre connexion Internet.
Résumé
14 AVERTISSEMENTS ET CONSEILS IMPORTANTS Il est très important que cette notice d’utilisation soit gardée avec l’appareil pour toute futureconsultation. Si cet appareil devait être vendu ou transféré à une autre personne, assurez-vous que lanotice d’utilisation suive l’appareil, de façon à ce que le...
15 ATTENTION: En dehors des températuresambiantes indiquées par la classe climatiqued’appartenance de ce produit, il est obligatoire derespecter les indications suivantes: lorsque latempérature ambiante descend sous la valeurminimum, la température de conservation ducompartiment congélateur peut ne ...
16 SOMMAIRE Avertissements et conseils importants 14 Renseignements pour l’élimination desmatériaux d’emballage 16 Utilisation 17 Nettoyage 17Utilisation du congélateur - Mise en service 17 Réglage de la température 17 Congélation rapide 17 Voyant d’alarme 18 Congélation 18 Conservation des produits...