ONKRON NP24 - Mode d'emploi
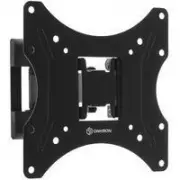
Support TV ONKRON NP24 - Mode d'emploi, à lire gratuitement en ligne au format PDF. Nous espérons que cela vous aidera à résoudre toutes les questions que vous pourriez avoir. Si vous avez encore des questions, contactez-nous via le formulaire de contact.
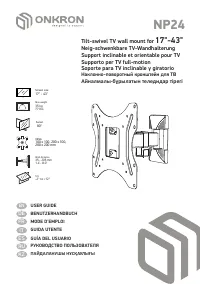
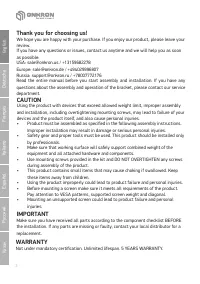
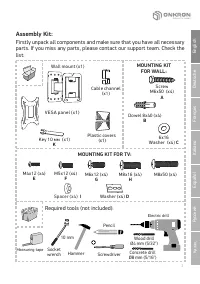
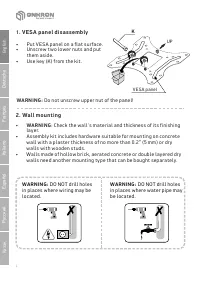
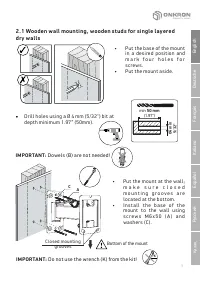
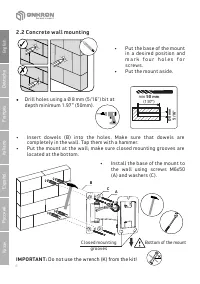
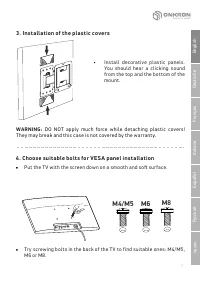
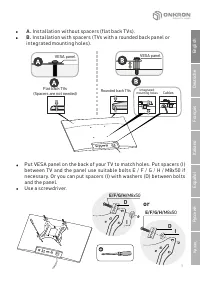
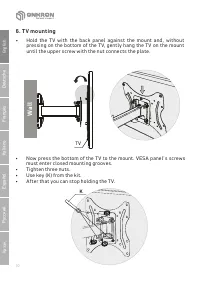
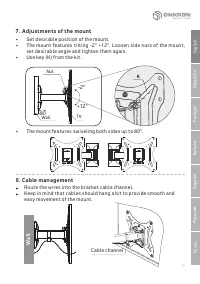
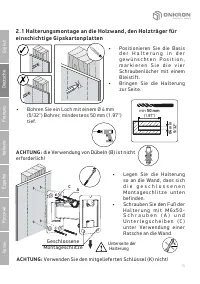
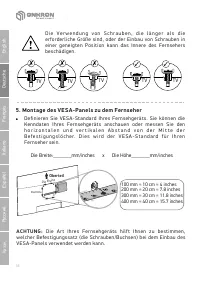
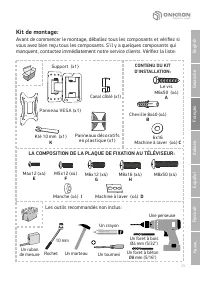
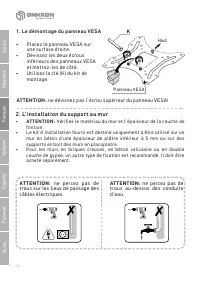
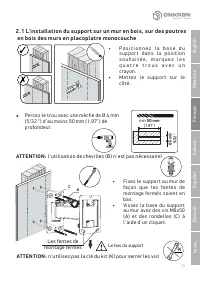
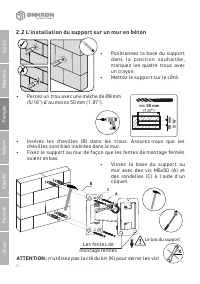
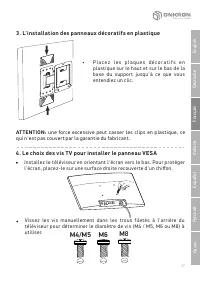
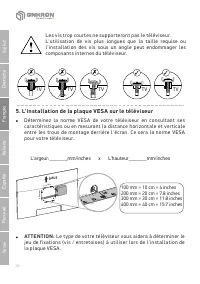
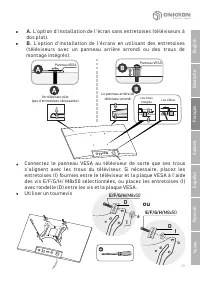
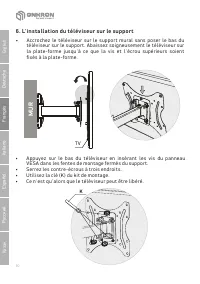
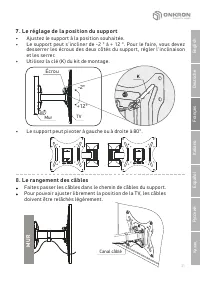
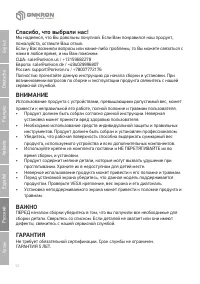
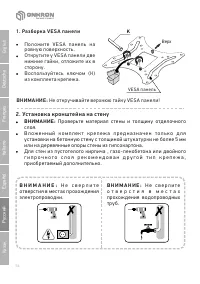
Table des matières:
- Page 2 – Қазақ
- Page 3 – Ру; Español; ammer
- Page 4 – . Wa l l m o u n t i n g; DO NOT drill holes; WA R N I N G; V E S A p a n e l d i s a s s e m b l y; UP
- Page 5 – Put; losed mounting
- Page 6 – C o n c r e t e w a l l m o u n t i n g; Bottom of the mount
- Page 7 – . C h o o s e s u i t a b l e b o l t s fo r V E S A p a n e l i n s t a l l a t i o n; Put the TV with the screen down on a smooth and sost sur face.; I n s t a l l a t i o n o f t h e p l a s t i c c o v e r s; Install
- Page 8 – Installation with spacers (TVs with a rounded back panel or; o r
- Page 9 – . T V m o u n t i n g; ll; Tighten; TV
- Page 10 – C a b l e m a n a g e m e n t; Route the wires into the bracket cable channel.; Set desirable position of the mount.; Nut; The mount features swiveling both sides up to; . A d j u s t m e n t s o f t h e m o u n t; Сable channel
- Page 11 – H a l t e r u n g s m o n t a g e a n d i e H o l z w a n d , d e n H o l z t r ä g e r f ü r; Geschlossene
- Page 12 – Oberteil; M o n t a g e d e s V E S A - Pa n e l s z u d e m Fe r n s e h e r
- Page 13 – Merci de nous avoir choisis!
- Page 14 – CONTENU DU KIT; LA COMPOSITION DE LA PLAQUE DE FIXATION AU TÉLÉVISEUR:; Les outils recommandés non inclus:
- Page 15 – L' i n s t a l l a t i o n d u s u p p o r t a u m u r; n e p e r c e z p a s d e; L e d é m o n t a g e d u p a n n e a u V E S A; ne dévissez pas l'écrou supérieur du panneau VESA!; Haut
- Page 16 – pour serrer les vis; L' i n s t a l l a t i o n d u s u p p o r t s u r u n m u r e n b o i s , s u r d e s p o u t r e s; Les fentes de; Le
- Page 17 – Percez un trou avec une mèche de Ø; L' i n s t a l l a t i o n d u s u p p o r t s u r u n m u r e n b é t o n; Mettez le support sur le côté.
- Page 18 – . L e c h o i x d e s v i s T V p o u r i n s t a l l e r l e p a n n e a u V E S A; L' i n s t a l l a t i o n d e s p a n n e a u x d é c o r a t i f s e n p l a s t i q u e; une force excessive peut casser les clips en plastique, ce
- Page 19 – . L' i n s t a l l a t i o n d e l a p l a q u e V E S A s u r l e t é l é v i s e u r; haut
- Page 20 – L'option d'installation de l'écranv en utilisant des entretoises; o u; tiliser un tournevis
- Page 21 – L' i n s t a l l a t i o n d u t é l é v i s e u r s u r l e s u p p o r t; Serrez les contre-écrous à trois endroits.
- Page 22 – L e r a n g e m e n t d e s c â b l e s; Faites passer les câbles dans le chemin de câbles du support.; Le support peut pivoter à gauche ou à droite à 80°.; L e r é g l a g e d e l a p o s i t i o n d u s u p p o r t; Сanal câblé
- Page 23 – Grazie per averci scelto!; DI
- Page 24 – ВНИМАНИЕ; Не требует обязательной сертификации.; ОБСЛУЖИВАНИЕ
- Page 25 – . Ус та н о в к а к р о н ш те й н а н а с те н у; Н е с в е р л и т е; . Ра з б о р к а V E S A п а н е л и; П о л о ж и те; Верх
- Page 26 – PAGE; rançais; SEITE; English
NP24
Max weight
35
kg
77
lbs
Tilt
-2° to +12°
Wall distance
35
-
205
mm
1.4"- 8.0"
Screen size
17
" -
43
"
S
wivel
80
°
VESA
100 x 100, 200 x 100,
200 x 200 mm
Tilt-swivel TV wall mount for
17 43
"-
"
Neig-schwenkbare TV-Wandhalterung
Support inclinable et orientable pour TV
Supporto per TV full-motion
Soporte para TV inclinable y giratorio
Наклонно-поворотный кронштейн для ТВ
Айналмалы-бұрылатын теледидар тірегі
EN
USER GUIDE
RU
РУКОВОДСТВО ПОЛЬЗОВАТЕЛЯ
ES
GUÍA DEL USUARIO
IT
GUIDA UTENTE
DE
BENUTZERHANDBUCH
FR
MODE D'EMPLOI
KZ
ПАЙДАЛАНУШЫ НҰСҚАУЛЫҒЫ
« Chargement du manuel » signifie que vous devez attendre que le fichier soit complètement chargé avant de pouvoir le lire en ligne. Certains manuels sont très volumineux, et le temps de chargement dépend de la vitesse de votre connexion Internet.
Ce manuel vous a-t-il été utile ?
À propos de ce manuel
- Marque
- ONKRON
- Modèle
- NP24
- Type de document
- Mode d'emploi
- Catégorie
- Support TV
- Langue(s)
- Allemand, Anglais, Espagnol, Français, Italien, Russe
- Pages
- 26
- Taille du fichier
- 9,9 MB
- Format
Résumé
2 Thank you for choosing us! We hope you are happy with your purchase. If you enjoy our product , please leave your review.If you have any questions or issues, contact us anytime and we will help you as soon as possible:USA: [email protected] / +13159682278 Europe: [email protected] / +494029996807 ...
3 Assembly Kit: Firstly unpack all components and make sure that you have all necessary parts. If you miss any parts, please contact our support team. Check the list: Wall mount (x1) Socket wrench Required tools (not included): MOUNTING KIT FOR TV: MOUNTING KIT FOR WALL : Measuring tape Қазақ Ру сск...
4 Қазақ Ру сский Español Italiano F rançais Deutsche English 2 . Wa l l m o u n t i n g WA R N I N G : DO NOT drill holes in places where wiring may be located. WA R N I N G : DO NOT drill holes in places where water pipe may be located. • WA R N I N G : Check the wall's material and thickness of it...

