Yamaha PSR-37- Manuels
Yamaha PSR-37- Manuel d'utilisation en ligne au format PDF.
Manuels:
Manuel d'utilisation Yamaha PSR-37


Résumé
Congratuißtions! You are the proud owner of a Yamaha PortaTone. Your PortaTone is a high-quality musical instrument that incorporates advanced Yamaha digital technology and many versatile features. In order to obtain maximum performance and enjoyment from your PortaTone, we urge you to read this Own...
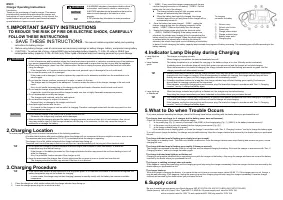
BEFORE YOU BEGIN Power Supply Your PSR-37 will run either from batteries or the optional power adaptor. Follow the instructions below according to the power source you intend to use. Using Batteries Six 1.5V SUM-1, "O'* size. R-20 or equivalent alkaline batteries (sold separately) must first be ...
Using an Optional Power Adaptor For AC Mains Power Use ONLY a Yamaha PA-1, PA-1 B, PA-3, PA-4 or PA-40 AC Adaptor to power your instrument from the AC mains. Refer to "Rear-panel Connectors" on page 7 for more details. For Car Battery Power The Yamaha CA-1 Car Battery Adaptor plugs into your...
Yamaha Manuels
-
 Yamaha CW2002100
Notice
Yamaha CW2002100
Notice
-
 Yamaha R N2000ABL
Notice d'Installation
Yamaha R N2000ABL
Notice d'Installation
-
 Yamaha SR B40ABL
Notice
Yamaha SR B40ABL
Notice
-
 Yamaha CS 800
Notice
Yamaha CS 800
Notice
-
 Yamaha ANAD 420FIOT B
Notice
Yamaha ANAD 420FIOT B
Notice
-
Yamaha ANAD 420FIOT B
Manuel d'utilisation
-
 Yamaha ANAD 420FIOT W
Manuel d'utilisation
Yamaha ANAD 420FIOT W
Manuel d'utilisation
-
Yamaha ANAD 420FIOT W
Notice
-
 Yamaha X2Y
Notice
Yamaha X2Y
Notice
-
Yamaha ATS C200
Manuel d'utilisation
-
 Yamaha EP E30A
Manuel d'utilisation
Yamaha EP E30A
Manuel d'utilisation
-
 Yamaha HTR 6072
Manuel d'utilisation
Yamaha HTR 6072
Manuel d'utilisation
-
 Yamaha ESC3
Manuel d'utilisation
Yamaha ESC3
Manuel d'utilisation
-
 Yamaha TTS303
Manuel d'utilisation
Yamaha TTS303
Manuel d'utilisation
-
 Yamaha YAS 108
Notice
Yamaha YAS 108
Notice
-
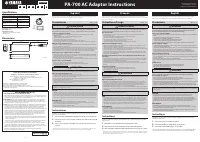 Yamaha PA 700
Manuel d'utilisation
Yamaha PA 700
Manuel d'utilisation
-
 Yamaha NP S303
Notice
Yamaha NP S303
Notice
-
 Yamaha MCRB043A
Manuel d'utilisation
Yamaha MCRB043A
Manuel d'utilisation
-
 Yamaha MCR B043
Manuel d'utilisation
Yamaha MCR B043
Manuel d'utilisation
-
 Yamaha EPHWS01
Manuel d'utilisation
Yamaha EPHWS01
Manuel d'utilisation