Canon IXUS Concept Arancia- Manuel d'utilisation

Canon IXUS Concept Arancia- Manuel d'utilisation, à lire gratuitement en ligne au format PDF. Nous espérons que cela vous aidera à résoudre toutes les questions que vous pourriez avoir. Si vous avez encore des questions, contactez-nous via le formulaire de contact.


1 Push the bottom cover lock tab
@8
in the
direction indicated by the arrow to open the
bottom cover
@7
.
2 Open the battery cover
@4
and load the battery.
The camera uses one CR2 type lithium battery.
When
blinks on the LCD panel
y
, replace
the battery.
3 Turn the film cartridge compartment cover lever
@6
in the direction indicated by the arrow and
open the film cartridge compartment cover
@5
.
4 Insert the film cartridge and close the film
cartridge compartment cover and close the
bottom cover.
Check that the visual exposure indicator of film is
(unexposed).
5 Slide the main switch
!1
downwards to turn
the camera on.
The lens cover opens.
6 Select the print type with the print type
selection lever
@2
.
You can choose from three print types: C print, H
print or P print.
7 Place the AF mark over the subject and
press the shutter button
r
.
8 When the film cartridge has finished and
the film has rewound, remove the film
cartridge from the camera.
The visual exposure indicator of film will be
(exposed).
E
N
G
L
I
S
H
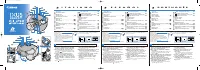
Nomenclature
AF Sensor
Viewfinder Window
AF Emitter
Shutter Button . . . . . . . . . . . . . . . . . . . . . . . .
¡
Light Metering Window
LCD Panel
SET Button . . . . . . . . . . . . . . . . . . . . . . . . .
¢∞
SELECT Button . . . . . . . . . . . . . . . . . . . . . .
¢§
Flash
Red-eye Reduction Lamp . . . . . . . . . . . . . .
™£
Main Switch . . . . . . . . . . . . . . . . . . . . . . . . . .
¡
Lens
Focal Length
DATE Button . . . . . . . . . . . . . . . . . . . . . . . .
¢∞
Self-timer Button . . . . . . . . . . . . . . . . . . . .
£
TITLE (Title selection) Button . . . . . . . . . . . .
§
Mid-roll Rewind Button
Flash Mode Button . . . . . . . . . . . . . . . . .
™
Orange Indicator
Green Indicator
Viewfinder
Print Type Selection Lever . . . . . . . . . . . . . . .
¡
Strap Mount
Battery Cover . . . . . . . . . . . . . . . . . . . . . . . . .
¡
Film Cartridge Compartment Cover . . . . . . .
¡
Film Cartridge Compartment Cover Lever . .
¡
Bottom Cover . . . . . . . . . . . . . . . . . . . . . . . . .
¡
Bottom Cover Lock Tab . . . . . . . . . . . . . . . . .
¡
Green and Orange indicators
Green indicator
Lit: Camera is focused (ready to shoot)
Blinking: Proximity warning
* If the proximity warning appears, move away
from the subject until the indicator stops
blinking and press the shutter button again.
Orange indicator
Lit: Flash has charged
Blinking (4 times/sec): Camera shake warning
Viewfinder
The viewfinder field changes when you switch
@2
. The
black areas will not be printed.
C
H
P
AF
mark
See the nomenclature for the number in the circle.
1
2
3
4
5
6
7
8
9
10
11
12
13
14
15
16
17
18
19
20
21
25
24
22
23
26
27
28
1
Basic Operations
1 Poussez la languette de verrouillage du
couvercle du fond
@8
dans la direction indiquée
par la flèche pour ouvrir le couvercle du fond
@7
.
2 Ouvrez le couvercle de logement de pile
@4
et
chargez la pile.
L’appareil photo utilise une pile au lithium de type CR2.
Lorsque
clignote sur le panneau LCD
y
,
remplacez la pile.
3 Tournez le levier du couvercle du logement
de cartouche de film
@6
dans le sens indiqué
par la flèche et ouvrez le couvercle du
logement de cartouche de film
@5
.
4 Insérez la cartouche de film et fermez le
couvercle du logement de cartouche de film,
puis le couvercle du fond.
Vérifiez si l’indicateur d’exposition visuel est
(non exposé).
5 Déplacez l’interrupteur principal
!1
vers le
bas pour mettre l’appareil photo sous
tension.
Le bouchon d’objectif s’ouvre.
6 Sélectionnez le type d’impression avec le
levier de sélection du type d’impression
@2
.
Vous pouvez choisir l’un des trois types
d’impression suivants: impression C, impression
H ou impression P.
7 Placez la marque AF sur le sujet et appuyez
sur le déclencheur
r
.
8 Lorsque la cartouche de film est terminée et
que le film est rembobiné, retirez la
cartouche de film de l’appareil photo.
L’indicateur d’exposition visuel est
(exposé).
F
R
A
N
Ç
A
I
S
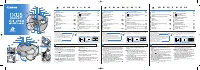
Nomenclature
Témoins vert et orange
Témoin vert
Allumé: L’appareil photo est au point
(prêt à prendre la photo)
Clignote: Avertissement de rapprochement excessif
* Si le témoin de rapprochement excessif apparaît,
éloignez-vous du sujet jusqu’à ce que le témoin s’arrête
de clignoter et appuyez de nouveau sur le déclencheur.
Témoin orange
Allumé: Le flash est en cours de chargement.
Clignote (4 fois/seconde): Avertissement de tremblement de l’appareil
Viseur
Le champ du viseur se modifie lorsque vous passez
@2
.
Les zones noires ne sont pas imprimées.
Impression
C
Impression
H
Impression
P
Marque
AF
Reportez-vous à la nomenclature pour le chiffre encerclé.
1
2
3
4
5
6
7
8
9
10
11
12
13
14
15
16
17
18
19
20
21
25
24
22
23
26
27
28
1
Opérations de base
1 Drücken Sie die Bodendeckel-Sperre
@8
in
Pfeilrichtung, um den Bodendeckel
@7
zu
öffnen.
2 Öffnen Sie den Batteriefachdeckel
@4
, und legen
Sie die Batterie ein.
Die Kamera arbeitet mit einer CR2-Lithiumbatterie.
Wenn
auf dem Display
y
blinkt, ersetzen
Sie die Batterie durch eine frische.
3 Drehen Sie den Filmkassettenfachdeckel-
Hebel
@6
in Pfeilrichtung, und öffnen Sie den
Filmkassettenfachdeckel
@5
.
4 Legen Sie die Filmkassette ein, und schließen
Sie dann den Filmkassettenfachdeckel und
den Bodendeckel.
Vergewissern Sie sich, daß die Belichtungsanzeige
des Films auf
(unbelichtet) steht.
5 Schieben Sie den Hauptschalter
!1
nach
unten, um die Kamera einzuschalten.
Die Objektivabdeckung öffnet sich dabei.
6 Wählen Sie mit dem Bildformat-Wählhebel
@2
das gewünschte Bildformat.
Sie können eines der folgenden drei Bildformate
wählen: C-Abzug, H-Abzug oder P-Abzug.
7 Richten Sie die Autofokusmarke auf das Motiv,
und drücken Sie dann den Auslöser
r
.
8 Sobald der Film nach der letzten Aufnahme
zurückgespult wurde, nehmen Sie die
Kassette aus der Kamera.
Die Belichtungsanzeige des Films steht nun auf
(belichtet).
D
E
U
T
S
C
H
Teilebezeichnungen
Empfänger für automatische Scharfeinstellung
Sucher
Sender für automatische Scharfeinstellung
Auslöser . . . . . . . . . . . . . . . . . . . . . . . . . . . .
¡
Meßzelle für automatische Belichtung
Display
SET-Taste . . . . . . . . . . . . . . . . . . . . . . . . . .
¢∞
SELECT-Taste . . . . . . . . . . . . . . . . . . . . . .
¢§
Blitz
Lampe für Rote-Augen-Reduzierung . . . .
™£
Hauptschalter . . . . . . . . . . . . . . . . . . . . . . . .
¡
Objektiv
Brennweite
DATE-Taste . . . . . . . . . . . . . . . . . . . . . . . . .
¢∞
Taste für Selbstauslöser . . . . . . . . . . . . . .
£
TITLE-Taste (Titelauswahl) . . . . . . . . . . . . . .
§
Rückspultaste
Blitzbetriebsart-Taste . . . . . . . . . . . . . .
™
Orangefarbene Anzeigelampe
Grüne Anzeigelampe
Sucher
Bildformat-Wählhebel . . . . . . . . . . . . . . . . . .
¡
Öse für Trageschlaufe
Batteriefachdeckel . . . . . . . . . . . . . . . . . . . .
¡
Filmkassettenfachdeckel . . . . . . . . . . . . . . .
¡
Filmkassettenfachdeckel-Hebel . . . . . . . . . .
¡
Bodendeckel . . . . . . . . . . . . . . . . . . . . . . . . .
¡
Bodendeckel-Sperre . . . . . . . . . . . . . . . . . . .
¡
Grüne und orangefarbene Anzeigelampe
Grüne Anzeigelampe
Leuchtet: Objektiv ist scharfgestellt (Kamera
ist aufnahmebereit)
Blinkt: Entfernungswarnung
* Wenn eine Entfernungswarnung gegeben wird, entfernen
Sie sich vom Motiv, bis das Blinken der Anzeige stoppt,
und drücken dann den Auslöser ein weiteres Mal.
Orangefarbene Anzeigelampe
Leuchtet: Blitz ist geladen
Blinkt (4mal/s): Verwackelungswarnung
Sucher
Wenn Sie
@2
verstellen, ändert sich der Bildausschnitt im
Sucher entsprechend. Die schwarzen Flächen im Sucher
bleiben unbelichtet.
C
-Abzug
H
-Abzug
P
-Abzug
A
uto
f
okusmarke
Die in Kreisen stehenden Nummern entsprechen den Nummern in der Übersicht "Teilebezeichnungen".
1
2
3
4
5
6
7
8
9
10
11
12
13
14
15
16
17
18
19
20
21
25
24
22
23
26
27
28
1
Grundlegende Bedienung
DATE
TITLE
C
H
P
1
2
3
4
5
6
7
8
9
10
11
12
14
15
16
17
18
19
20
21
25
24
22
23 26
13
27
28
Faisceau récepteur AF
Fenêtre de viseur
Faisceau émetteur AF
Déclencheur . . . . . . . . . . . . . . . . . . . . . . . . . .
¡
Fenêtre de posemètre
Panneau LCD
Touche SET (de réglage) . . . . . . . . . . . . . .
¢∞
Touche SELECT . . . . . . . . . . . . . . . . . . . . .
¢§
Flash
Lampe d’atténuateur d’yeux rouges . . . . .
™£
Interrupteur principal . . . . . . . . . . . . . . . . . . .
¡
Objectif
Longueur focale
Touche DATE . . . . . . . . . . . . . . . . . . . . . . . .
¢∞
Touche de retardateur . . . . . . . . . . . . . . . .
£
Touche TITLE (sélection d’un titre) . . . . . . . .
§
Touche de rembobinage à mi-course
Touche de mode de flash . . . . . . . . . . .
™
Témoin orange
Témoin vert
Viseur
Levier de sélection du type d’impression . . .
¡
Monture de dragonne
Couvercle de logement de pile . . . . . . . . . . .
¡
Couvercle du logement de cartouche de film . .
¡
Levier du couvercle de logement de cartouche de film
¡
Couvercle du fond . . . . . . . . . . . . . . . . . . . . .
¡
Languette de verrouillage du couvercle du fond
¡
Viewfinder
Viseur
Sucher
CT1-7469-001
PRINTED IN MALAYSIA
K156 16-10-2002 09:05 Page 1
„Téléchargement du manuel“ signifie que vous devez attendre que le fichier soit complètement chargé avant de pouvoir le lire en ligne. Certains manuels sont très volumineux, et le temps de chargement dépend de la vitesse de votre connexion Internet.